Sometimes the included integration capabilities of CRIBWISE is not enough to solve the data needs in your shop floor system landscape. In that case we can offer a custom data export tailored to the specific need you have in terms of file format and data schema. This integration addon allows for exporting data from CRIBWISE to various destinations and with flexible scheduling options, all fully configurable from the CRIBWISE Admin Portal.
Supported destinations
Below you can see a list of the currently supported export destinations. We are continuously working on adding new types of destinations as usage of the addon increases.
- FTP or sFTP server
- Azure Storage Account (account key authentication)
- Azure Storage Account (Microsoft Entra (former Azure AD) access token)
Ordering
This is a two step process. As the logic needed for exporting the data is tailored to your requirements the process starts with a quote request. This allows for analysis of the requirements and our integration team works together with you to agree on the final structure of the data export. To start this process you order the “CRIBWISE Integration Development” addon in CMP, see screenshot below. Once ordered someone from our Integration team will reach out and collect the requirements.  When the development work has been completed you can go ahead and update your CRIBWISE subscription and add the “Custom Data Export” addon. This will enable the integration configuration page in CRIBWISE Admin Portal where you can configure the export destination selected and also the scheduling options.
Configuration
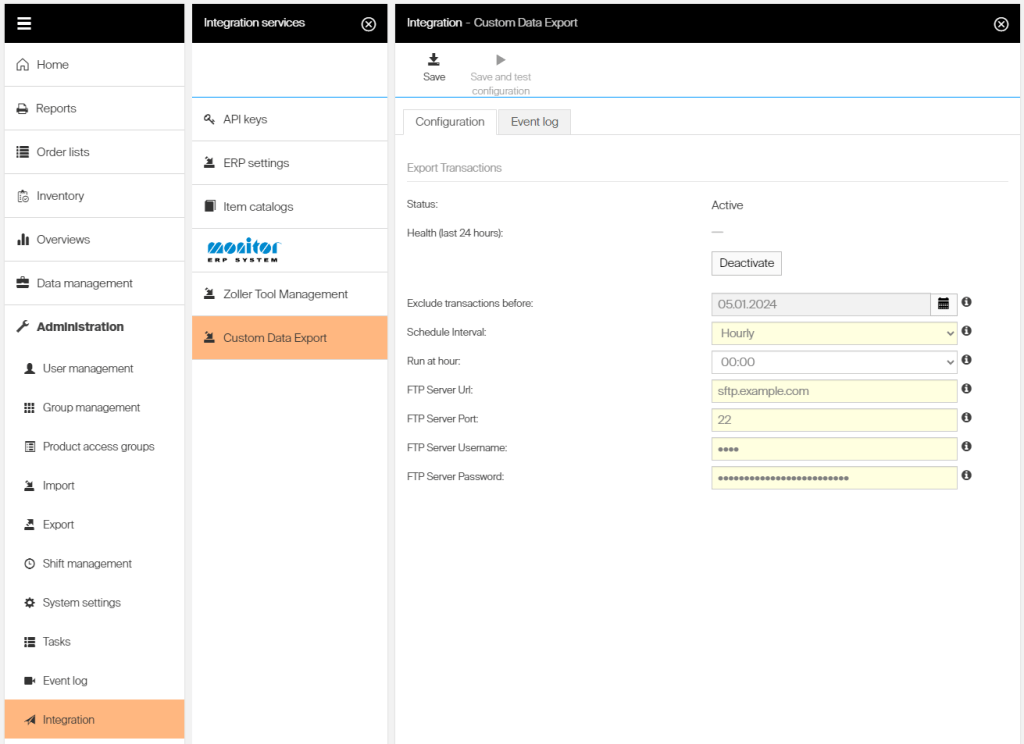
The the addon has been enabled you can complete the setup by going to CRIBWISE Admin Portal and selecting “Administration” and “Integration” in the left menu pane. You should now see a option in the integration menu for “Customer Data Export”. On the configuration page you can add the needed details for the export destination (see screenshot below for an example where the destination is an sFTP server), the schedule interval and if you want to exclude transactions that occurred before a certain date. Please note that the configuration page will show different options depending on which destination you have selected.
- Exclude transactions before: Exports are usually based on transactions that happen within CRIBWISE. This options allows for excluding transactions that occurred before a certain date.
- Schedule interval:
- Daily: Export will run once per day seven days per week. If you select this option you need to select a hour when the export should run.
- Hourly: Export will run once per hour, at the top of each hour.
- Weekly: Export will run once per week, on the day selected.
- Run at hour: When you have selected interval “Daily” or “Weekly” you can also select for which hour the export should run.
- Run on day: When “Weekly” is the schedule interval you need to select which day of the week the export should run. For interval “Daily” and “Hourly” this setting has no effect.
- Export destination configuration: Depending on which export destination you have selected this section will look different. For details on you selected destination please see dedicated sections below.
FTP or Secure FTP server
- Server Host: Fully qualified domain name (FQDN) or IP address for the server. This host need to be publicly accessibly from the CRIBWISE cloud.
- Server Port: Port number to use when establishing a connection with the host
- Username: Username to use when establishing a connection with the host
- Password: Password to use when establishing a connection with the host
- Recipient(s) Email: Recipient(s) of the e-mail. To provide multiple addresses use a semi-colon separated list
Azure Storage Account BLOB (account key)
- Storage account name: Name of your Azure storage account resource (e.g if you account FQDN is fabrikam.blob.core.windows.net then you enter fabrikam)
- Container name: Name of the container where the file should be uploaded
- Account key: Your storage account access key
Azure Storage Account BLOB (Entra Access token)
- Storage account name: Name of your Azure storage account resource (e.g if you account FQDN is fabrikam.blob.core.windows.net then you enter fabrikam)
- Container name: Name of the container where the file should be uploaded
- Client id: Client Id of the application identity to use for authentication
- Client secret: Client secret for the application identity to for authentication
- Tenant id: Id of the tenant that the application identity belongs to