How to create pick lists with the export/import function
Read time: ~4 minutes
Applies to: Admin Portal
What you can do
Create and manage pick lists in bulk by exporting a template, filling it in Excel, and importing the completed file back into the Admin Portal.
Before you start
- You need Administrator or Manager access to the Admin Portal.
- The pick list feature must be enabled in System settings > Stock daily use.
- Know which items you want to include — you’ll need the item ID for each.
- If you want to assign cost allocation to a pick list, have the cost allocation set ID and values ready.
Important: Pick lists cannot be created through the Admin Portal UI directly. The export/import function (or the REST API) is the only way to create and update them.
Quick start
Experienced users — create a pick list in 5 steps:
- Go to Admin Portal > Data > Export/Import.
- Select the Pick lists entity and export a template.
- Fill in the exported Excel file with your pick list data.
- Import the completed file back into CRIBWISE.
- Verify the pick list appears under Stock daily use > Pick lists.
Need more detail? Follow the full steps below.
Steps
Step 1 — Open the export/import function
- Log in to the Admin Portal.
- Navigate to Data > Export/Import in the left-hand menu.
The Export/Import page displays a list of available data entities.
Step 2 — Export the pick list template
- Locate Pick lists in the entity list.
- Click Export.
- Save the Excel file to your computer.
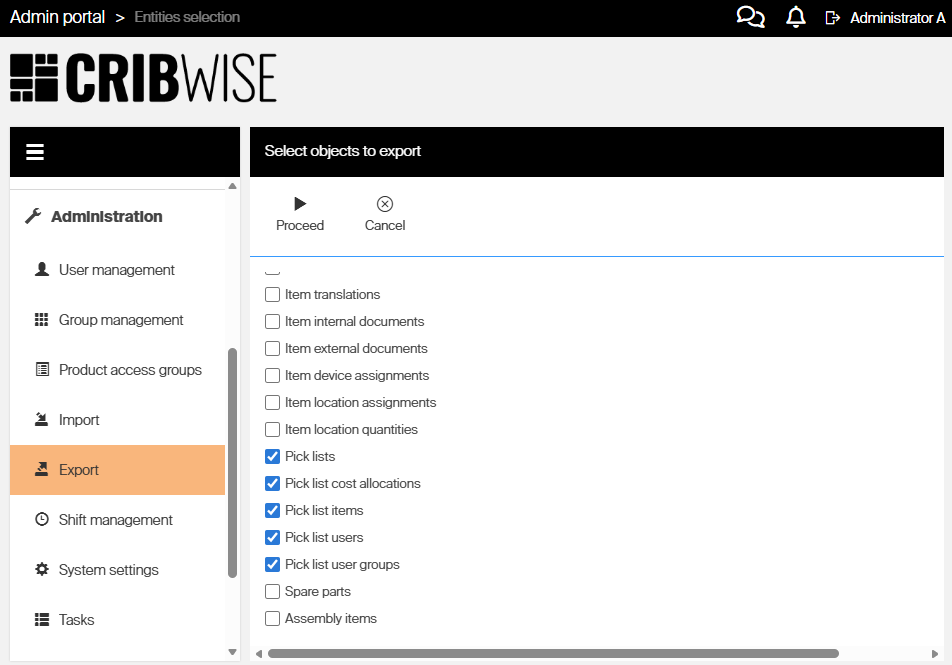
The exported file contains the column headers and any existing pick list data. If no pick lists exist yet, the file contains only the header row — use this as your template. Exporting with the all-options setting gives you a file with all existing pick lists divided into separate tabs.
Tip: If you already have pick lists in the system, the export includes them. You can use existing rows as examples for the format.
Step 3 — Understand the Excel tabs
The exported file contains multiple tabs. Only the Picklists and PickListItems tabs are mandatory all other tabs can be left empty.
Picklists tab
This tab defines each pick list. It is the starting point for setup. For help choosing values for Allow Change Quantity, Fixed Quantities, and Allow Pick More Than Requested, see the combination examples below.

| Column | Required | Description |
|---|---|---|
| Id | No | Leave blank for new rows. Enter the existing ID to update. |
| IsDeleted | No | TRUE or FALSE. Set to TRUE on a row that has an existing PickListId to delete that pick list on import. Leave blank or FALSE for normal create/update. |
| Pick list ID | No | The unique ID of the pick list. Leave blank when creating a new pick list — CRIBWISE assigns the ID on import. Enter the existing ID when updating an existing pick list. |
| Name | Yes | A descriptive name visible to users on the SFI (e.g., “Monday maintenance kit”). |
| Allow change quantity | No | TRUE or FALSE. If TRUE, users can adjust the quantity during picking. Default: FALSE. |
| Fixed quantities | No | TRUE or FALSE. If TRUE, the pick list remains active after all items are picked and can be reused. Default: FALSE. |
| Target Date | No | Informational date displayed on the SFI (format: YYYY-MM-DD). |
| Device ID | No | Restrict this pick list to a specific SFI device. Leave blank to show on all devices. |
| Allow Pick More Than Requested | No | TRUE or FALSE. If TRUE (and Allow change quantity is also TRUE), users can pick more than the listed amount. Default: FALSE. |
| Active Till Date | No | The pick list becomes inactive after this date (format: YYYY-MM-DD). Leave blank for no expiry. |
PickListCostAllocations tab
Sets which cost allocation values are pre-filled for a pick list. If left empty, users choose cost allocation themselves during picking on the SFI. If used, all fields need a value.

| Column | Required | Description |
|---|---|---|
| ID | No | Leave blank for new rows. Enter the existing ID to update. |
| Is deleted | No | TRUE or FALSE. Set to TRUE on an existing row to remove that cost allocation assignment on import. Leave blank or FALSE for normal create/update. |
| Pick list ID | Yes | The ID of the pick list this cost allocation belongs to (must match a row in the Picklists tab). |
| Order | Yes | The step (position) within the cost allocation hierarchy that this value applies to. Start at 1 for the first step and increase by 1 for each deeper step. Use one row per step. |
| Cost allocation step | Yes | The ID of the cost allocation step to use. |
| Cost allocation set ID | Yes | The ID of the cost allocation set to use. |
| Cost allocation value | Yes | The pre-selected cost allocation value for this step. Must be a valid value within the step chosen. |
Picklistitems tab
Defines which items belong to each pick list and what quantity to pick. A pick list without any items in this tab will not appear on the SFI.
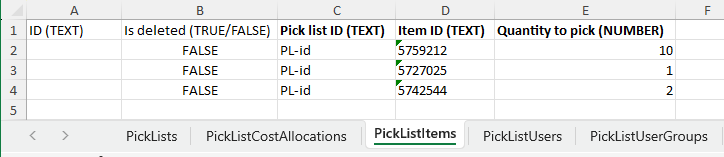
| Column | Required | Description |
|---|---|---|
| ID | No | Leave blank for new rows. Enter the existing ID to update. |
| Is deleted | No | TRUE or FALSE. Set to TRUE on an existing row to remove that item from the pick list on import. Leave blank or FALSE for normal create/update. |
| Pick list ID | Yes | The ID of the pick list this item belongs to. |
| Item ID | Yes | The CRIBWISE item ID to include in the pick list. |
| Quantity to pick | Yes | The number of units to pick. Must be greater than 0. |
Pick list users tab
Restricts the pick list to specific users. If this tab is left empty, all users can see and use the pick list.

| Column | Required | Description |
|---|---|---|
| ID | No | Leave blank for new rows. Enter the existing ID to update. |
| Is deleted | No | TRUE or FALSE. Set to TRUE on an existing row to remove that user restriction on import. Leave blank or FALSE for normal create/update. |
| Pick list ID | Yes | The ID of the pick list to restrict. |
| User name | Yes | The Login of the user who should have access to this pick list. |
Picklistusergroups tab
Restricts the pick list to specific user groups. If this tab is left empty, all user groups can access the pick list.
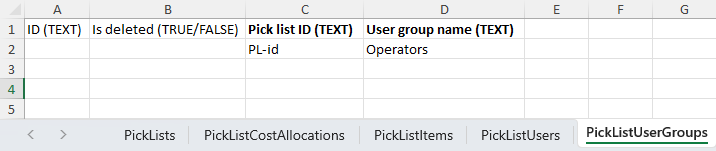
| Column | Required | Description |
|---|---|---|
| ID | No | Leave blank for new rows. Enter the existing ID to update. |
| Is deleted | No | TRUE or FALSE. Set to TRUE on an existing row to remove that user group restriction on import. Leave blank or FALSE for normal create/update. |
| Pick list ID | Yes | The ID of the pick list to restrict. |
| User group name | Yes | The name of the user group that should have access. |
Tip: Only the Picklists and Picklistitems tabs are mandatory. Leave the other tabs empty if you do not need cost allocation pre-fills or access restrictions.
Step 4 — Import the completed file
- Return to Data > Export/Import in the Admin Portal.
- Locate Pick lists in the entity list.
- Click Import.
- Select your completed Excel file.
- Review the import summary for any validation errors.
- Click Confirm to start the import.
Note: If the import detects errors (e.g., invalid item IDs, missing required fields), it displays them in the summary. Fix the errors in Excel and re-import.
Success: Your pick lists are now available in the system. Users who match the assigned restrictions (users, user groups, device) will see them on the Shop Floor Interface under the Pick list menu.
Next steps
After creating your pick lists:
- Test on SFI — Log in to the Shop Floor Interface and confirm the pick list appears under the Pick list menu. See How to pick items from a predefined pick list.
- Update or delete — To modify an existing pick list, export again, edit the row (keep the Id value), and re-import.
Combination examples
The three quantity-behavior fields on the Picklists tab work together. Use the table below to pick the combination that matches what you want.
| AllowChange Quantity |
Fixed Quantities |
AllowPickMore ThanRequested |
Quantity behavior | After all items picked |
|---|---|---|---|---|
| ✅ | ✅ | ✅ | Can pick less and more | Pick list stays available |
| ✅ | ✅ | ❌ | Can pick less, not more | Pick list stays available |
| ✅ | ❌ | ✅ | Can pick less and more | Pick list closes |
| ✅ | ❌ | ❌ | Can pick less, not more | Pick list closes |
| ❌ | ✅ | any | Quantity is fixed | Pick list stays available |
| ❌ | ❌ | any | Quantity is fixed | Pick list closes |
Tip:
AllowPickMoreThanRequestedonly has an effect whenAllowChangeQuantityis also TRUE. That is why the last two rows show “any” — the value is ignored.
Troubleshooting
| Problem | Likely cause | Fix |
|---|---|---|
| Pick list does not appear on SFI | The pick list is restricted to a specific user, user group, or device that doesn’t match the current session. | Check the Users, User groups, and Device ID fields. Clear restrictions or add the correct user/device. |
| Pick list does not appear on SFI (cost allocation mismatch) | The pre-filled cost allocation values on the pick list don’t match any of the cost allocation values the user is allowed to pick from on the device. | Open the Picklistcostallocations tab and verify the CostAllocationValue entries are valid in the referenced cost allocation set and are allowed for the user on that device. Update the values (or clear them so the user selects during picking) and re-import. |
| Import fails with validation errors | Required fields are missing or item IDs don’t exist in the system. | Review the error messages, fix the Excel file, and re-import. Verify item IDs exist in your inventory. |
| Pick list shows status “Invalid” | The assigned cost allocation set or values are no longer valid in the system. | Update the cost allocation configuration or remove the CA assignment from the pick list and re-import. |
| Pick list disappears after use | “Fixed quantities” is set to FALSE and all items have been picked to zero. | Set “Fixed quantities” to TRUE if the pick list should remain available for repeated use. |
| Users can’t change the pick quantity | “Allow change quantity” is set to FALSE. | Export the pick list, set the field to TRUE, and re-import. |
Related articles
- Understanding pick lists: setup and management — Full reference for all pick list parameters and behavior options.
- How to pick items from a predefined pick list — SFI user guide for picking against a predefined list.
- ERP REST Pick list — API documentation for creating and managing pick lists programmatically.
- How to configure custom cost allocation lists and hierarchies — Set up the cost allocation structures referenced by pick lists.
- Customer Use Case – Pick List — Real-world example of pick list configuration and usage.