Import data functionality allows to load import template to add, update or remove data in the system. Only templates provided by export functionality can be used. If any changes were made to template structure or manually created file is used, import cannot be performed.
Each object in the file is identified by ID (first column).
Existing objects from export operation can be edited, but object ID must be left unchanged.
When creating new objects using import, object ID must be left empty and will be automatically filled during import operation.
In specific cases when hierarchy of values is imported (item own categories and CA hierarchy and restrictions), ID column is not present. During such import, existence of entity (category, place in hierarchy of CA values) is determined based on business information (category name, CA value).
System shows all these changes as update in import summary.
See more details in Import of hierarchy relations.
When entity from one sheet is referring to another (f.e. device relation to stock), reference is done using object’s unique information (f.e. stock name to define device relation to stock).
In some cases, more than one reference must be specified to ensure uniqueness of a referred entity. As example, item assignment to location requires references to device, storage device, storage module (if any) and location name to identify specific location.
Following table shows how each entity on each sheet can be connected with another one:
| Sheet | Reference to | Referenced by |
| Currency | – | |
| OrderTemplate | – | |
| Vendor | Manufacturer | Manufacturer name |
| OrderTemplate | Order template name | |
| OrderTemplate (cons.) | Order template name | |
| Currency/System settings | Currency name (vendor specific or system default) | |
| Manufacturer | – | |
| Address | Vendor | Vendor name |
| ContactPerson | Vendor | Vendor name |
| Stock | Stock | Stock name |
| Device | Stock | Stock name |
| User (Device admin) | Login | |
| User (Contact person) | Login | |
| Storage device | Device | Device name |
| Storage module | Storage device | Device name + Storage device name |
| Stock location | Storage device | Device name + Storage device name |
| Storage module | Device name + Storage module name | |
| Item | Category | Category with relations |
| Alternative Item | Item ID | |
| Vendor | Vendor name | |
| Manufacturer | Manufacturer name | |
| Service vendor | Vendor name | |
| Item translation | Item | Item ID |
| Item internal document | Item | Item ID |
| Item external Document | Item | Item ID |
| Item device assignment | Item | Item ID |
| Device | Device name | |
| Item location assignment | Item | Item ID |
| Stock location | Device name + Storage device name + Storage module name + location name | |
|
Item location quantities
|
Item | Item ID |
| Stock location | Device name + Storage device name + Storage module name + location name | |
| Pick list | Device | Device ID |
| Pick list cost allocation | Pick list CA value CA set |
Pick list ID CA level type name + CA value CA set ID |
| Pick list items | Pick list Item |
Pick list ID Item ID |
| Pick list users | Pick list User |
Pick list ID Login |
| Pick list user groups | Pick list User group |
Pick list ID User group name |
| Spare part relation | Item | Item ID |
| Item (Spare part) | Item ID | |
| Assembly items | Assembly Assembly item |
Item ID Item ID |
| Serialized item instances | Item | Item ID |
| Stock location | Device name + Storage device name + Storage module name + location name | |
| CA custom level type | – | |
| CA level | CA level type CA set |
CA level type name CA set ID |
| CA definition | CA level CA set |
CA level type name CA set ID |
| CA hierarchy | CA definition | CA definition value with relations |
| CA set | CA set ID | |
| CA item restriction | CA hierarchy CA set Item |
CA definition value with relations CA set ID Item ID |
| CA user restriction | CA hierarchy CA set User |
CA definition value with relations CA set ID Login |
| CA user group restriction | CA hierarchy CA set User group |
CA definition value with relations CA set ID User group name |
| Item notification | Item ID | Item ID |
| CA level thumbnail | CA level | CA level type name |
| CA definition thumbnail | CA definition | CA level type name + CA definition value |
| PAG included items | Product access group Item |
PAG Name Item ID |
| PAG excluded items | Product access group Item |
PAG Name Item ID |
| PAG quantity restrictions | Product access group Item |
PAG Name Item ID |
| User group | – | |
| User | User group | User group name |
| User key | User | Login |
| Settings | User (Device admin) | Login |
| Customer settings | – |
Order templates cannot be imported using import data flow. To import order templates, follow flow described in Purchase article. Importing of data consists from following steps:
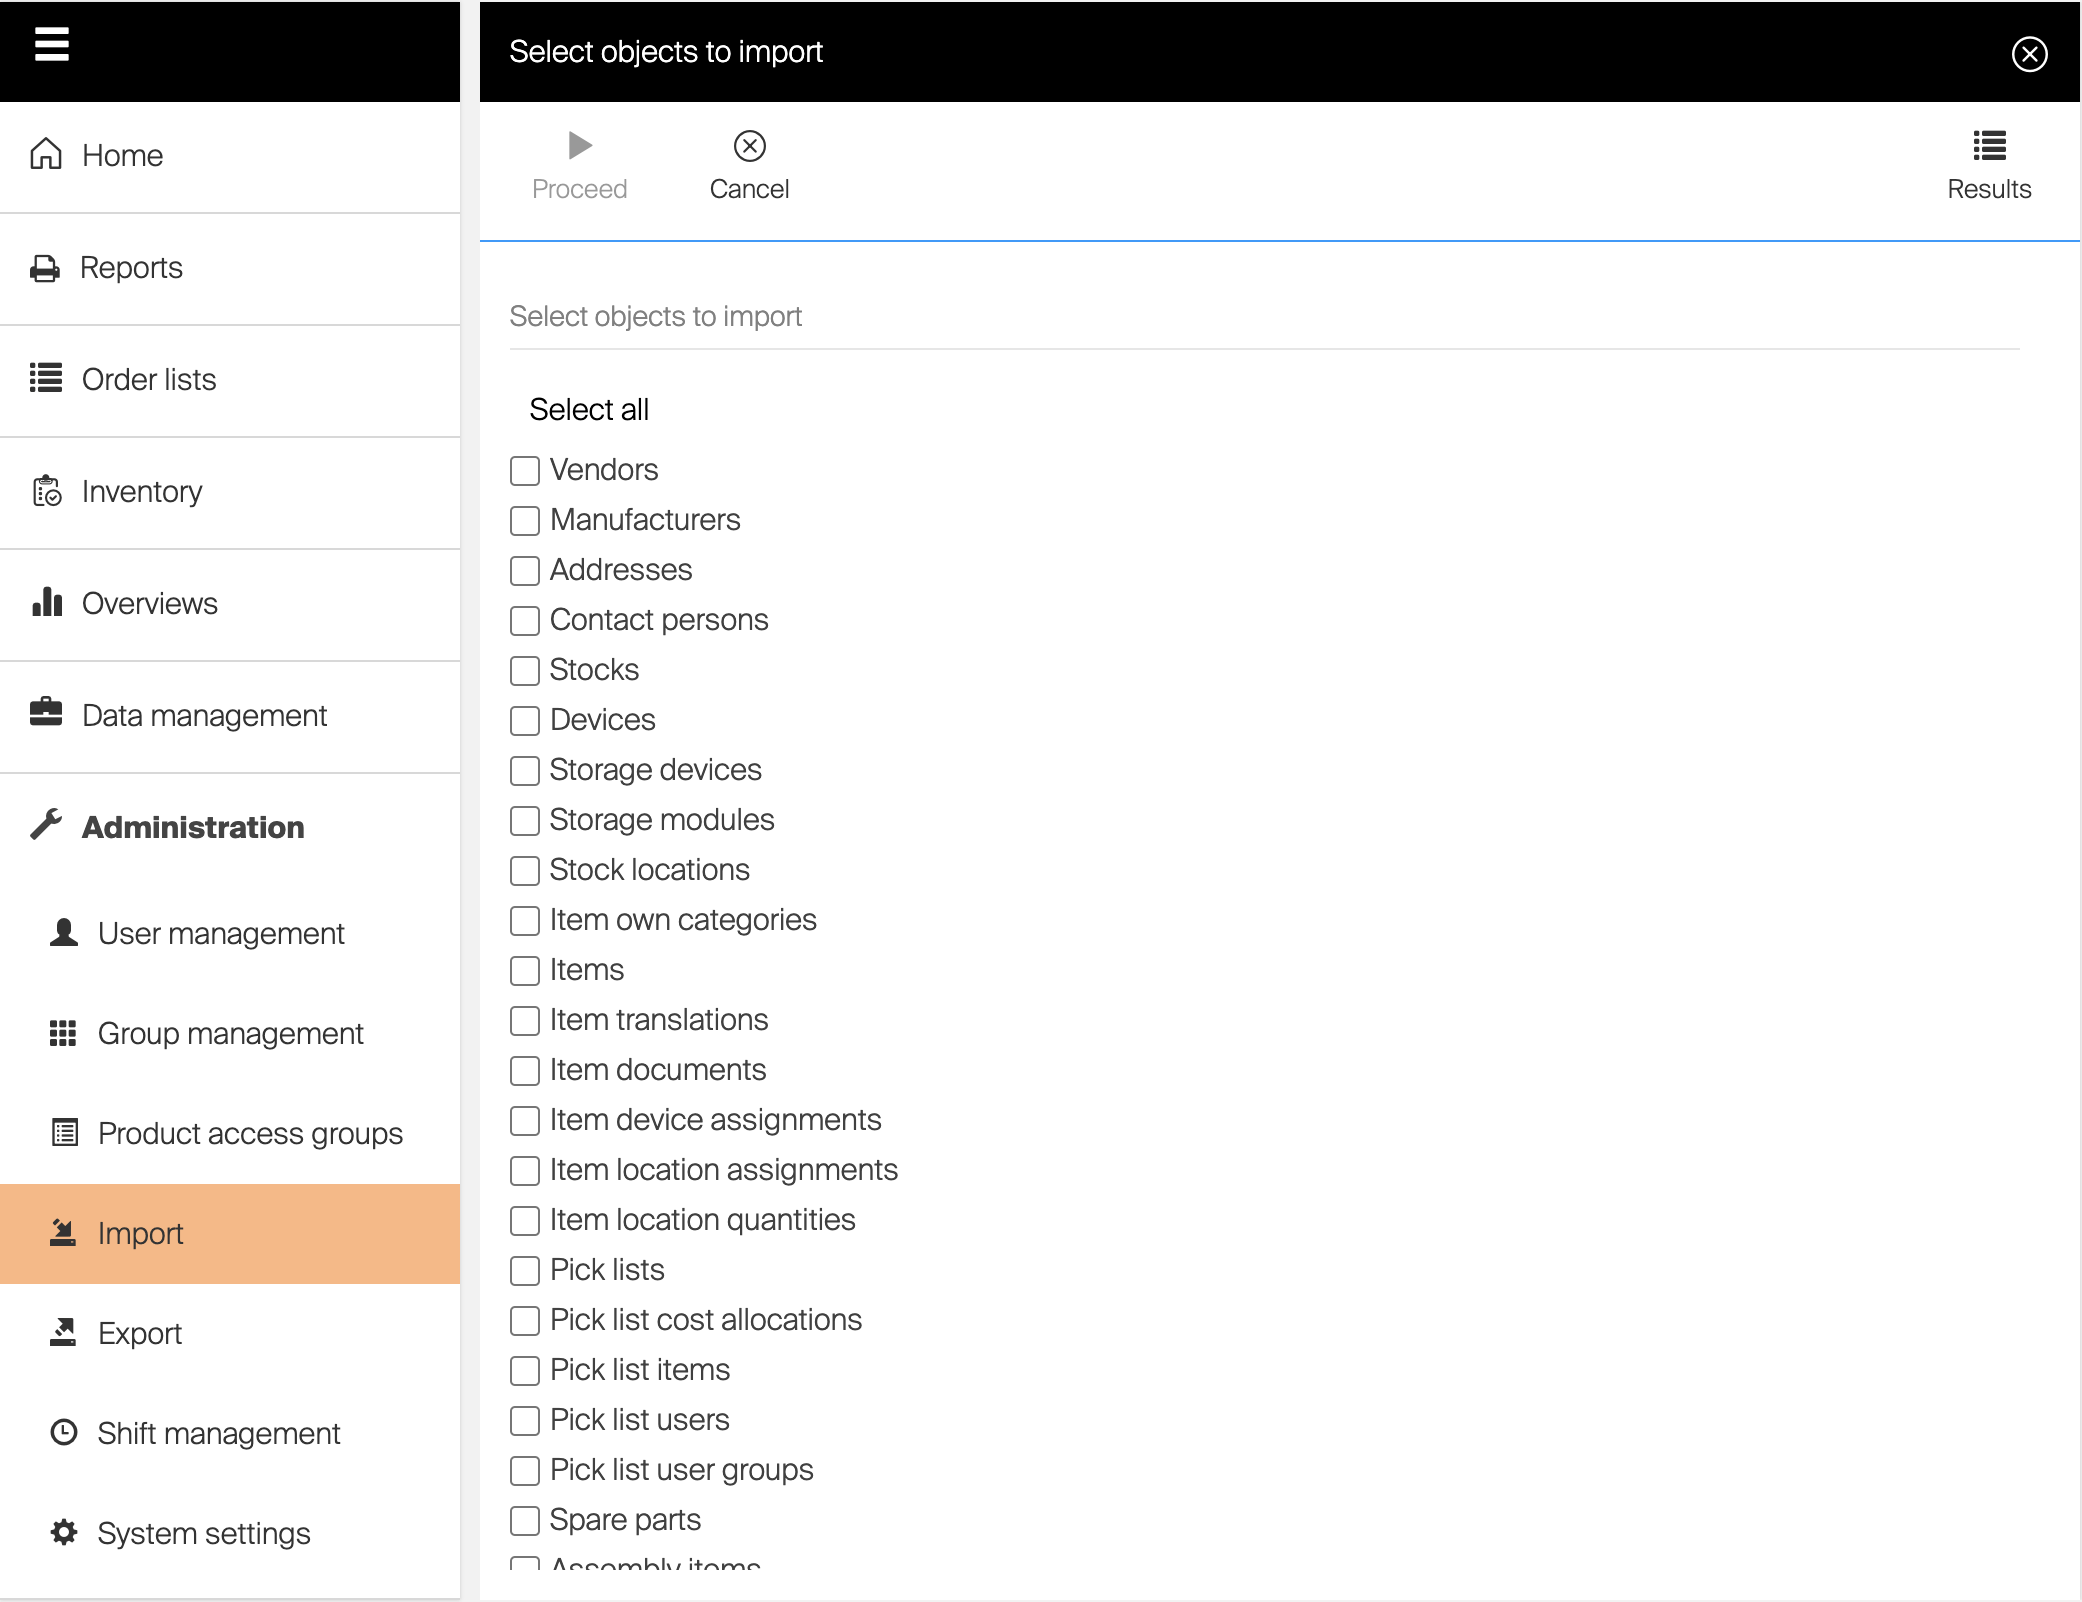
- Select objects to import – if object located in import file is not selected in this screen, object is omitted during import.
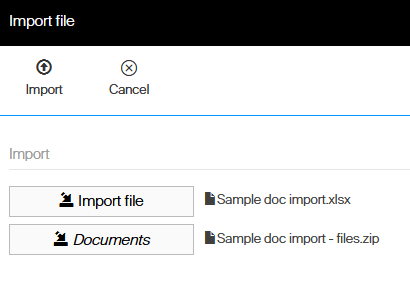
- Select files to import – after file is selected, basic file information is shown. Confirm selected file by clicking to Import file
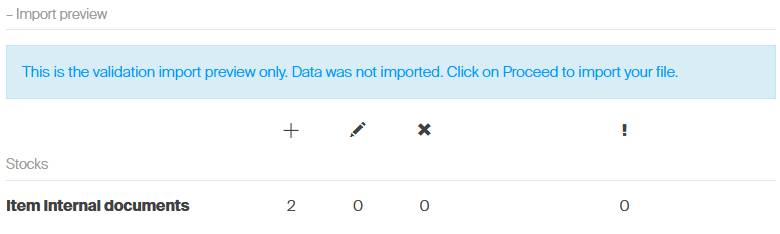
If objects containing picture (CA step, CA definition) and/or item documents are selected for import, zip archive containing these pictures and documents should be selected together with the Excel file. Pictures and documents are referenced in the Excel file using file name. - Preview import – all objects are loaded from file and summary of imported file is shown with total count of new items (their IDs are empty in import file), items updated (their IDs are specified in import file) and items to delete (Is deleted column is set to TRUE). If changes are agreed, proceed to database update by pressing Proceed button.
- Import is started. Based on server workload and amount of data this operation can take up to minutes. When data are imported, information toaster is shown.
- By clicking to View detail button summary of import operation can be opened. Screen shows all objects with total counts on new, updated, removed and erroneous objects. All invalid rows can be downloaded in separate Excel file with error information. After data are fixed, this file can be imported again.
- Original file is stored for each finished import and can be downloaded from import results screen or import detail
Import preview does only syntactical analysis of imported data. It can report invalid data types, missing mandatory values and update of non existing entities. More complex business validations are not performed in this step (like references between items or field content validation based on another field etc.)
If any syntactical problem is found during import review, number of problematic rows will be shown. In such case, it is possible to download these problematic rows to Excel sheet, where any problem will be marked directly in related cell. Problems can be solved in the sheet and this file could be uploaded again (file contains all rows from original sheet).
Import result list automatically clears historical records older than six months
Import images and documents
When images or other documents are being imported (item internal documents, cost allocation thumbnails for steps or values or customer image), import requires two files to be provided – Excel file with import template and ZIP archive containing these files referenced in the Excel file. While importing images or documents, follow these steps:
- Create reference (or update existing reference) to a file in import template. Reference to the file is always identified with type FILE in column header. File name including its extension should be specified.

- Place all files referenced in the import template to ZIP archive. Ensure that file name of each file corresponds with reference in the import template.
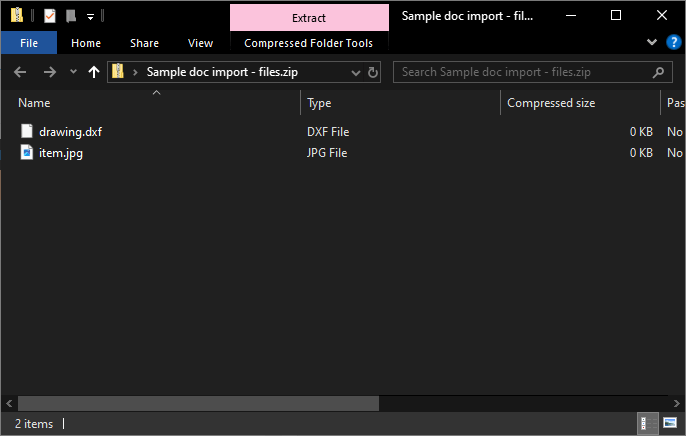
- On Admin Portal, start the import and select what entities should be imported. If entity containing references to external files is selected, option to upload ZIP archive with the files is shown. Select the import template and ZIP archive containing files to proceed.
- Start the import to apply changes.
Following entities contain reference to binary files:
- Item internal documents
- Cost allocation step thumbnails (exported together with Cost allocation step)
- Cost allocation definition thumbnails (exported together with Cost allocation definition)
- Customer logo
When importing item images (item internal document of type Image), system must recognize the file as an image. The most common image file types are supported. Size of the image is not limited. Single item cannot have multiple internal documents of type Image or type Drawing.
Import of hierarchy relations
Import offers option to create hierarchy relations for some entities and create references to these hierarchies. This allows easy way how item categories, Cost allocation hierarchies and Cost allocation hierarchy restrictions could be setup and updated.
Setup a hierarchy
To setup a hierarchy (in case of setup of item own categories and Cost allocation hierarchy of values), rows have no ID column. Hierarchy then can be specified starting with root value in the first column (the one next to Is deleted column), with each following column containing a child value. Values can be specified more than once in the import file:

File defined above showing import file of item categories will result in following setup after import:

Marking row as deleted will remove specified hierarchy from system, including all child entities:
| Is deleted (TRUE/FALSE) | Category tree (TEXT) | |
| TRUE | Turning |
This example will remove category Turning with all child categories (Turning holders and Turning tools)
| Is deleted (TRUE/FALSE) | Category tree (TEXT) | |
| TRUE | Turning | Turning holders |
This example will remove category Turning holders from parent category Turning. Category Turning tools will remain in system.
When setting up Cost allocation hierarchy, specified CA values needs to exist for hierarchy steps of given order
Setup a relation to hierarchy
Some entities can be assigned to specific place to hierarchy, like items to category and restrictions to Cost allocation hierarchy. To setup such relation, specify path in the hierarchy starting in first dedicated column for root, with child nodes specified in following columns, like f.e. for items:
| ID (TEXT) | Is deleted (TRUE/FALSE) | Item ID (TEXT) | Own category (TEXT) | |
| 1 | FALSE | Item1 | Turning | Turning holders |
This example will assign Item1 to category Turning -> Turning holders.
Change physical quantities by import
It is possible to update physical quantities in devices using Excel import.
To perform this action, export sheet Item location quantities.
Any change in column Physical quantity will be tracked as a transaction – Placement transaction in case when quantity has been increased and Withdraw transaction in case when quantity has been decreased.
Quantity of serialized items cannot be changed using this sheet, serialized items are not listed there.
To change physical quantities of serialized items, export sheet Serialized items and update location (by reference to device, storage device, module, and location name) of specific serial number to add or remove serial number to or from location.
Any change on serialized items is tracked by Placement or Withdraw transactions same as in case of non-serialized items.
It is not possible to change physical quantities via Excel import when device is running. See this article for more details about avoiding synchronization conflicts