Lift and paternoster machines offer specific way of working which is different from other types of vending machines for vending operations (pick, return, inventories etc.) and for management of available locations. This chapter describes these differences and provides information how to work with machines of these types.
CRIBWISE currently supports following lift and paternoster machines:
-
- KARDEX Megamat RS
- KARDEX Shuttle XP
- Modula Lift
- Weland Compact
- Hänel Lean-Lift
- Hänel Multi-Space
All information is valid for all three of these types. If behavior is specific for one type only, it is mentioned in text.
Item manipulation operations
All operations manipulating with items (like pick, return, inventory), consist of following steps on lift and paternoster machines:
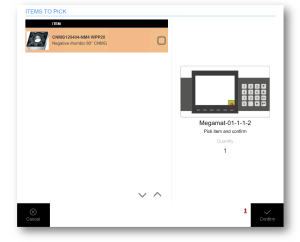
- Fetch tray where desired item is placed and provide it to operator. Provide visual guidance to location if supported by the machine (show location by laser pointer, display position on LED screen, etc.).
- Wait for confirmation from operator, that item has been processed (picked, returned, etc.).
- If another item/location should be processed from the same tray, provide visual guidance to the next location if supported by the machine. Wait for confirmation from operator, that the next location has been processed.
- If another item/location should be processed from different tray, dispose current tray and provide the other tray to the operator.
- If no other location should be processed, dispose the last tray back to the machine.
Locations to be processed are always ordered by trays. All locations in a tray will be possible to process without need to dispose the tray and fetch it again in later stage.
Confirmation of operation on location must be done by operator by:
- Confirm by button on SFI screen (1).
- [KARDEX only] Confirm by button on Kardex control panel (position of confirm button visualized in image as 2).
- [Weland Compact only] Confirm by control panel, pedal or confirmation buttons in machine’s opening.
Some operations require specific input to be made on SFI, like entering of serialized number or during inventory. In these cases, control panel of the machine will show text information to provide this input on the SFI and confirmation on the control panel will not be possible (will be ignored). To continue, follow SFI instructions.
Pressing cancelation on the control panel acts the same as cancelation of current operation via SFI.
Management of trays
All machine types offer option to setup all locations according to specific customer’s needs. Each machine comes with defined number of trays and structure of locations in each tray could be freely defined by a customer.
To manage locations in trays, enter Manage KARDEX/Modula/Weland/Hänel locations option in Stock management. In case of multiple storage devices of type Megamat RS, Shuttle XP, Modula Lift, Weland Compact or Hänel, select storage device to manage in the next step.
The option to manage locations of lift machine is not visible if there are no lift machines or current user does not have privilege to Setup locations.
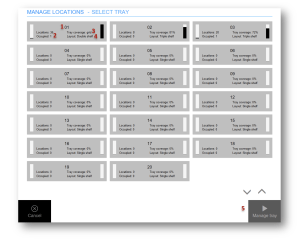
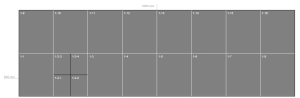
List of all available trays will be shown, with additional information helping to locate available space for placing an items or to create new locations:
- Tray name (1) – name could be changed in AP or in the next step in the SFI. Name could be set to custom value to help identify items stored in it.
- Number of existing locations and number locations where items are assigned (2). Ratio is visualized by bar on the left.
- Percentual coverage of tray with locations, indicating if any additional location could be created (3). If locations on tray are created via grid layout (described further), tray is always fully covered. Coverage is visualized by bar on the right side.
- [KARDEX Megamat RS only] Layout of tray (4). This information is shown for Megamat RS only and indicates if there are more horizontal levels in the tray. Number of locations and coverage of the tray are always calculated for all levels.
To proceed to tray detail, select tray and press Manage tray (5).
View tray layout
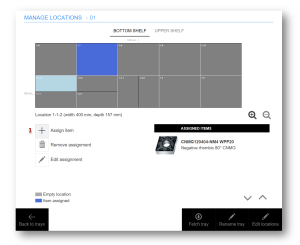
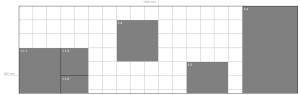
After selecting a tray, tray layout is shown indicating all existing locations on selected tray. Locations with at least one assigned item are shown with different color.
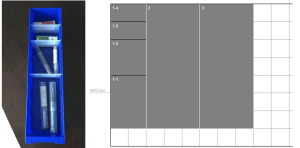
In case when one location is a box which is further divided to smaller locations inside, this setup could be reflected also in the tray layout to help operator with orientation between physical locations and locations shown in the tray layout. The box (base location) is shown with white border. Each separator splitting the box to smaller locations (sub locations) are shown as black line. Following is example of box separated into smaller locations and its visualization in the tray layout (locations 1-1, 1-2, 1-3, 1-4 are sub locations of location 1, locations 2 and 3 are defined without separators):
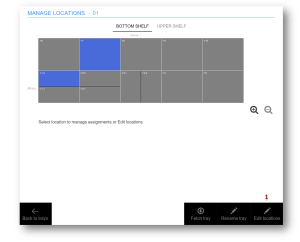
To work with assignments on location, select a location (1). To fetch the tray to opening to access it, press Fetch tray (2). Fetching operation can take a few seconds. To set custom name of the tray, press Rename tray (3). To change structure and layout of locations, press Edit locations (4).
[KARDEX Megamat RS only] If tray is from Megamat RS machine and there are more levels (shelves) available, selection of shelf will be visible to switch between layout of all shelves (5). This option is not visible for other lift types or if there is only single level in a tray.

Assign item to location
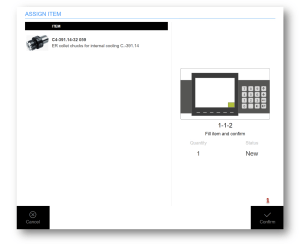
When location is selected, all items assigned in that locations will be shown. New item could be assigned by pressing Assign item button (1). Selection of item and assignment options will follow (read more details about assigning item to location).
If physical quantity is selected to be placed during the assignment, tray will be fetched to allow placing this quantity to location (if the tray is not available already). Once placed, confirm the placement on SFI (1) or on control panel.
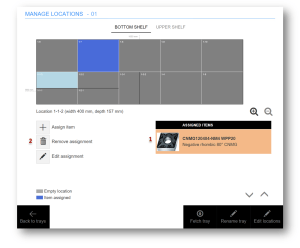
Remove item from location
To remove item from location, select the item from list assigned items in a location (1). After that press Remove assignment (2). If there is any physical quantity to be removed, tray will be fetched to allow removing this quantity from location (if the tray is not available already). Once removed, confirm the action on SFI (1) or on control panel.
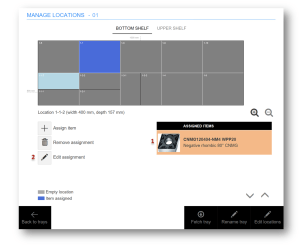
Edit assignment options
To edit location assignment settings, select the item from list assigned items in a location (1). After that press Edit assignment (2). Once settings are changed, press Save to return back to tray management.
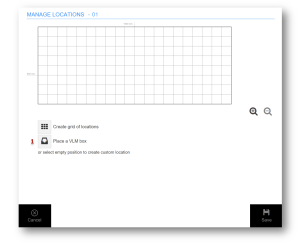
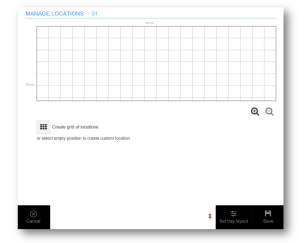
Edit locations
Locations in each tray (and in each shelf in case of KARDEX Megamat RS) can be created in two ways, using a grid mode or custom mode.
In grid mode, whole area of the tray is covered by locations split to specific number of columns and rows. Each location can then be split again or merged to achieve desired layout. This mode is recommended for regular layouts as it is fastest to create.
In custom mode, locations can be placed freely on the tray with custom sizes of each. This mode is recommended for non-regular layouts or usage boxes freely placed on a tray.
It is not possible to combine both modes. To switch between modes, all locations in a tray must be removed.
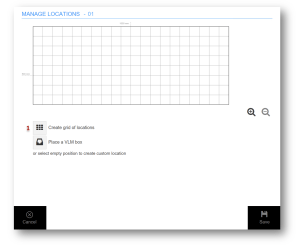
To enter locations edit mode, open tray from list of available trays and select Edit locations (1) button. The location edit mode is shown automatically if selected tray has no location.
All changes made in locations layout need to be saved to be applied. No data will be lost or updated before changes are saved.
Removing location with items assigned will remove these assignments after changes are saved. If there was any physical quantity in such location, withdraw transaction will be generated for this quantity.
Working with grid mode
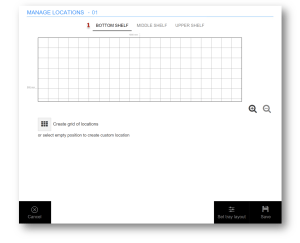
To create locations in grid mode, select Create grid of location on an empty tray (1).
On the next step, enter number of rows and columns to specify how many locations will be created. Confirm the choice. Maximum number of rows and columns is calculated to not exceeds device’s grid size in width and depth. The grid size can be 50 mm or 25 mm, depending on storage device settings (see management of storage devices).
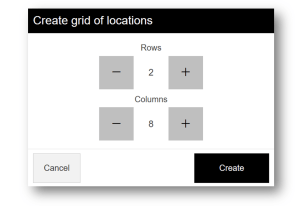
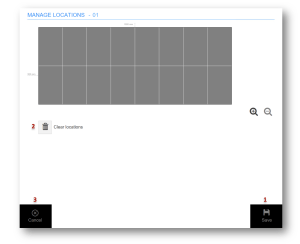
Confirmation will display created locations in the tray layout. Locations are not saved yet. If structure is according expectations, press Save (1) to create locations. To revert action taken, press Clear locations (2) to remove all locations from the layout or press Cancel (3) without saving changes.
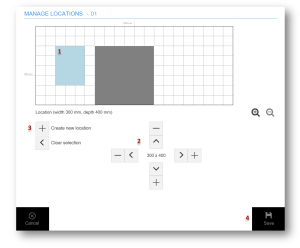
To further modify created layout, select a location and then continue with one of following options:
- Split location – option to further split current location by specifying number of rows and columns. Split could be selected to be done with separators. Doing so will result in single location separated visually into smaller ones, for cases when there is a box divided to smaller locations.
- Merge with right location – available only if location on the right side is of the same depth like currently selected location. Option will merge these two locations to single one.
- Merge with down location – available only if location bellow is of the same width as currently selected location. Option will merge these two locations to single one.
Merge cannot be done between base locations and locations created with separators.
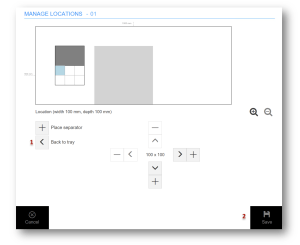
Working with custom mode
To create a custom locations, select any empty position (1) on a tray layout. Navigation buttons will be shown (2) to allow move the selection and define its size. Once selection is according expectations, confirm the new location (3). Location is not created yet, to create the location, apply changes by pressing Save button (4) (or continue with location definition and perform the save afterwards).
Minimum size of a location is defined by device’s grid size. The grid size can be 50 mm or 25 mm, depending on storage device settings (see management of storage devices).
Custom locations cannot be created if tray contains locations created in grid mode.
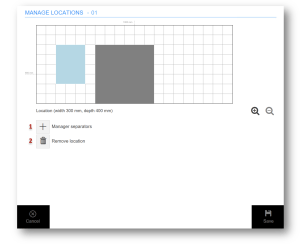
Once location is placed, another location could be placed by selecting empty space or existing location can be split by separators or removed. To work with existing location, select it on tray and select to manage separators (1) or remove it (2).
When managing separators for a location, it is possible to work with sub locations in the same way like when defining base location. Working area is limited by size of the base location. When finished, return to tray (1) to continue with location setup or press save (2) to apply all changes made on the tray and return to assignment management.
Working with VML boxes
Option available for KARDEX Shuttle XP devices only
Once in empty tray or in tray defined by custom mode, it is possible place VLM box (1). This option will place location to the tray with dimensions 800 mm * 600 mm, which is available for purchase as Kardex Shuttle XP accessory. Position of this box on the tray is determined automatically. If no VLM box could be placed on the tray, option (1) is disabled.
Placed VLM box acts the same like location created in custom mode. It is possible to further split the box to smaller locations using separators.
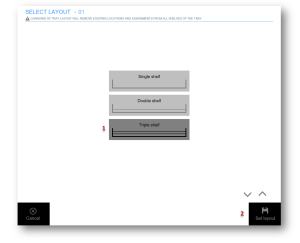
Set type of tray
Option available for KARDEX Megamat RS devices only
For Megamat RS machines, option to specify tray type is available to set number of shelves in a tray. By default, all trays are set with single shelf only. To change the type to two or three shelves for a tray, enter Locations edit mode and press Set tray layout option (1).
Select desired layout (1) and confirm the selection (2).
Changing of the layout will remove all locations and assignments existing on the tray. In contrary to other changes in tray layout which needs to be saved before they are applied, this change is applied immediately and is irreversible.
When tray is set with more than one shelf, shelf selection (1) will be shown both in assignment management and locations edit modes.