This document is based on the experience with configuration of the ASK200 machine (main cabinet) with 3 extensions cabinet and describes the steps needed to run everything.
State in the beginning
The machines were received in the following state from the Sielaff:
- Main cabined configures with standard image, everything set to default, configured and working as single unit.
- All extension cabinets were received in exactly same state, configured to be connected as single only extension cabinet to the master cabinet.
Problems
1. Main cabinet configuration file didn’t contain configuration for the extension cabinets. 2. Main cabinet TwinCAT wasn’t configured to communicate with the extension cabinets. 3. All the extension cabinets were configured with same static IP addresses (10.60.80.12), so once connected to the master cabinet they were in the conflicts and only was available at the time. 4. IP cameras on all extension cabinets were configured with same static IP addresses (10.60.80.13), so they were in the conflicts too and only was available at the time.
Solution
Keep all the extension cabinets connected to the main cabinet and configure them one by one (change static IP addresses) until no extension cabinet is left with the default static address for extension cabinets. Following steps should be repeated per extension cabinet connected giving them IP addresses 10.60.80.22, 10.60.80.32, 10.60.80.42, … and same for IP cameras giving addresses 10.60.80.23, 10.60.80.33, 10.60.80.43,…
Wiring
There should be a switch available within the master cabinet. The cables should be from PLC of the master cabinet to the switch and then from the switch to every extension cabinet. Configuration of the PLC static IP address
1. Start c:\DRIVERs\CERHOST.exe
2. In the application select File -> Connect and put 10.60.80.12 to the hostname
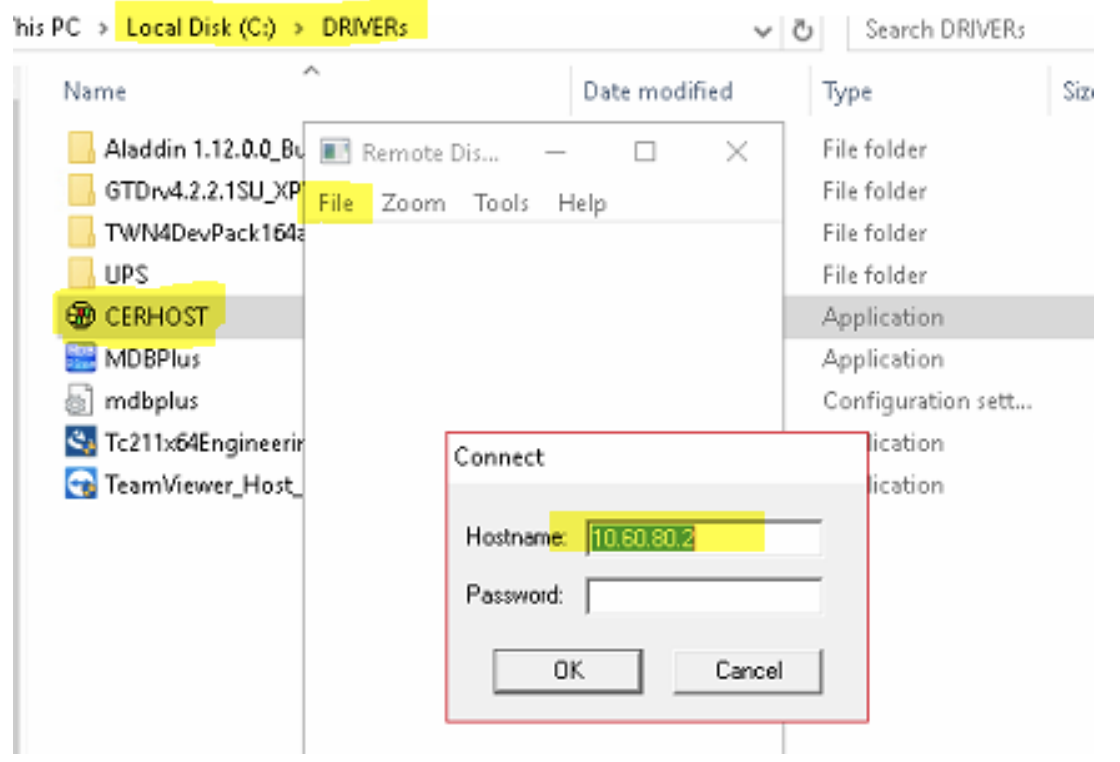
3. Once connected to the Windows CE running on the PLC, go to Start -> Control Panel -> Network and Dial-up Connections
4. Double click FEC1 network connection and change the IP to the required one (for example 10.60.80.22) and click OK in the window header to confirm
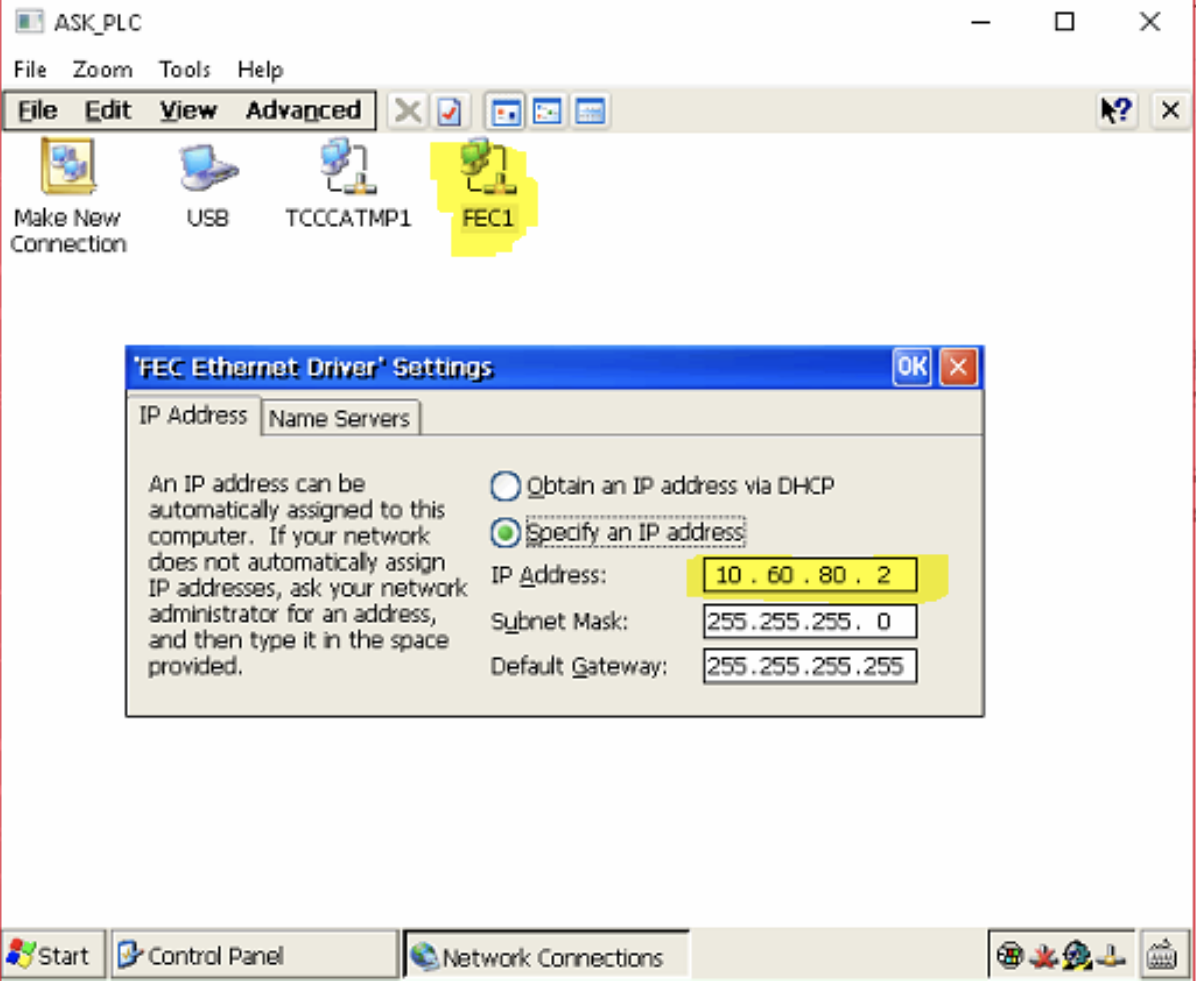
5. This will disconnected the remote connection, wait a while, in the menu select File -> Disconnect and then again File -> Connect and connect to the new IP address (for example 10.60.80.22) which will bring you again access to the Windows CE running on the PLC
6. Now open Start -> Programs -> Windows Explorer and navigate to Hard Disk -> System and start application named TcAmsRemoteMgr.exe. In the application change the AMS Net Id to match the IP address of the extension cabinet, i.e. for example from 10.60.80.12.1.1 to 10.60.80.22.1.1 and press OK to close the application.

7. Finally to make fresh start of the PLC system, press Start -> Reset 8. You can now close the CERHOST.exe, to verify that the IP address was changed successfully, you can try to ping the new IP address (start cmd.exe and type for example: ping 10.60.80.22 and the PLC should respond)
Setting up communication from master cabinet to the extension cabinet PLC in the TwinCAT software
1. On the main cabinet, in the installed Windows, start application named TwinCAT System Manager
2. In the opened application navigate in the left tree to SYSTEM – Configuration, by pressing Choose Target button open Choose Target System window and using Search (Ethernet) button open Add Route Dialog. In the dialog press Broadcast Search button
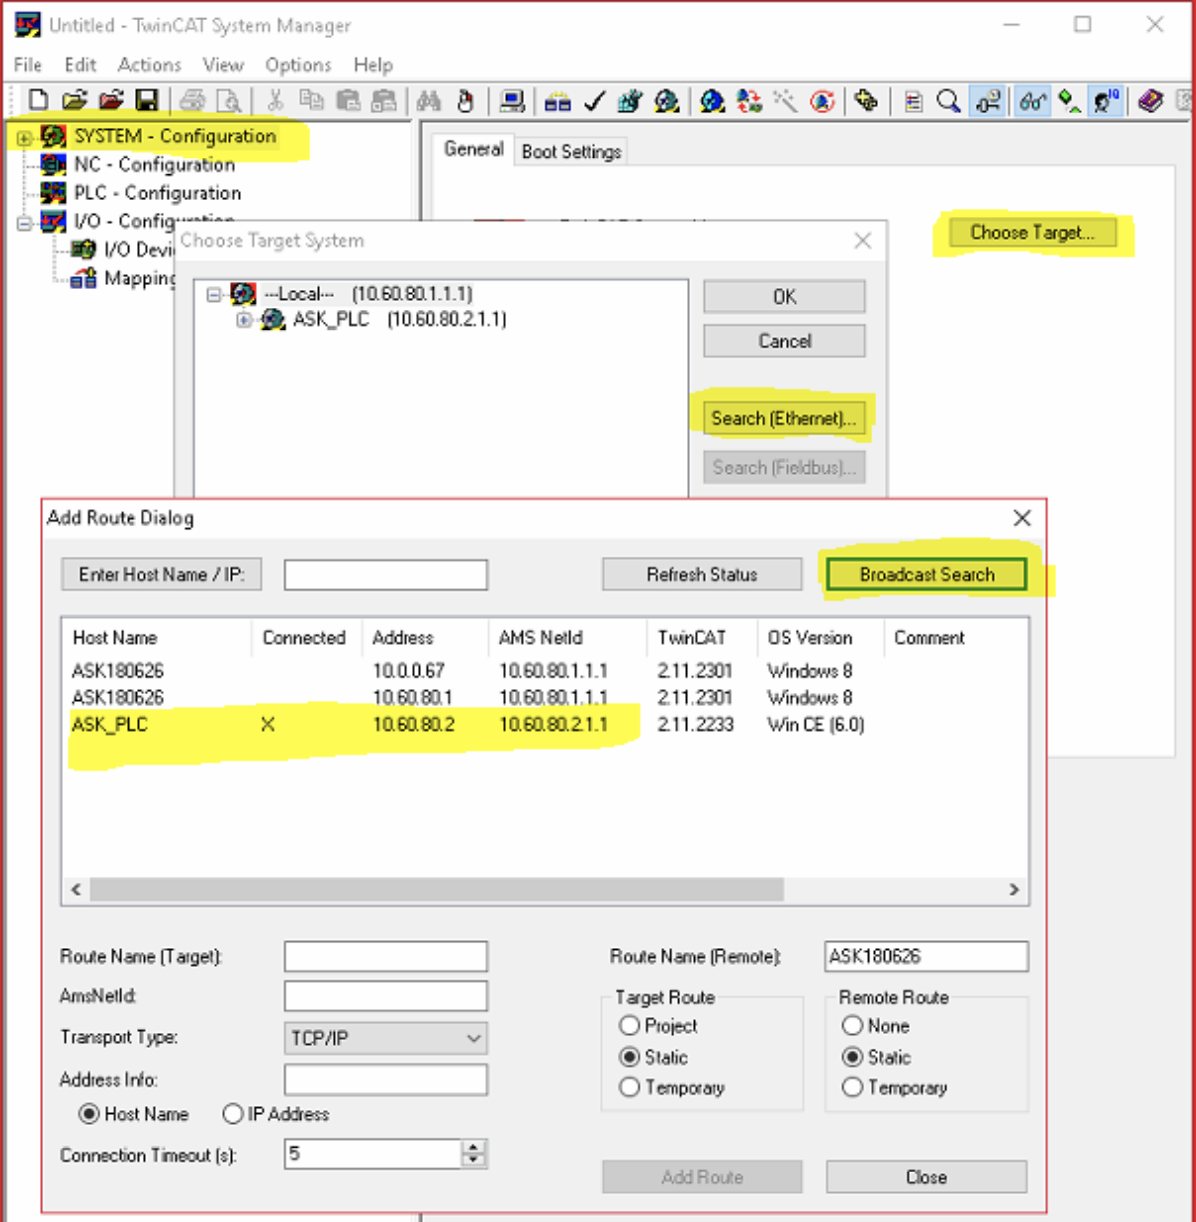
3. This should fill up the Add route dialog with the entries and you should be able to see there an entry with the set IP address in the previous step (for example 10.60.80.22) with AMS NetId configured (for example 10.60.80.22.1.1). There should not be X in the Connected column.
4. Select this entry in the grid, and in the bottom part of the window fill up the name of the route (for example to ASK_PLC_22), switch the option box from Host Name to IP Address and press Add Route button which should setup this route and the X should appear the Connected column.
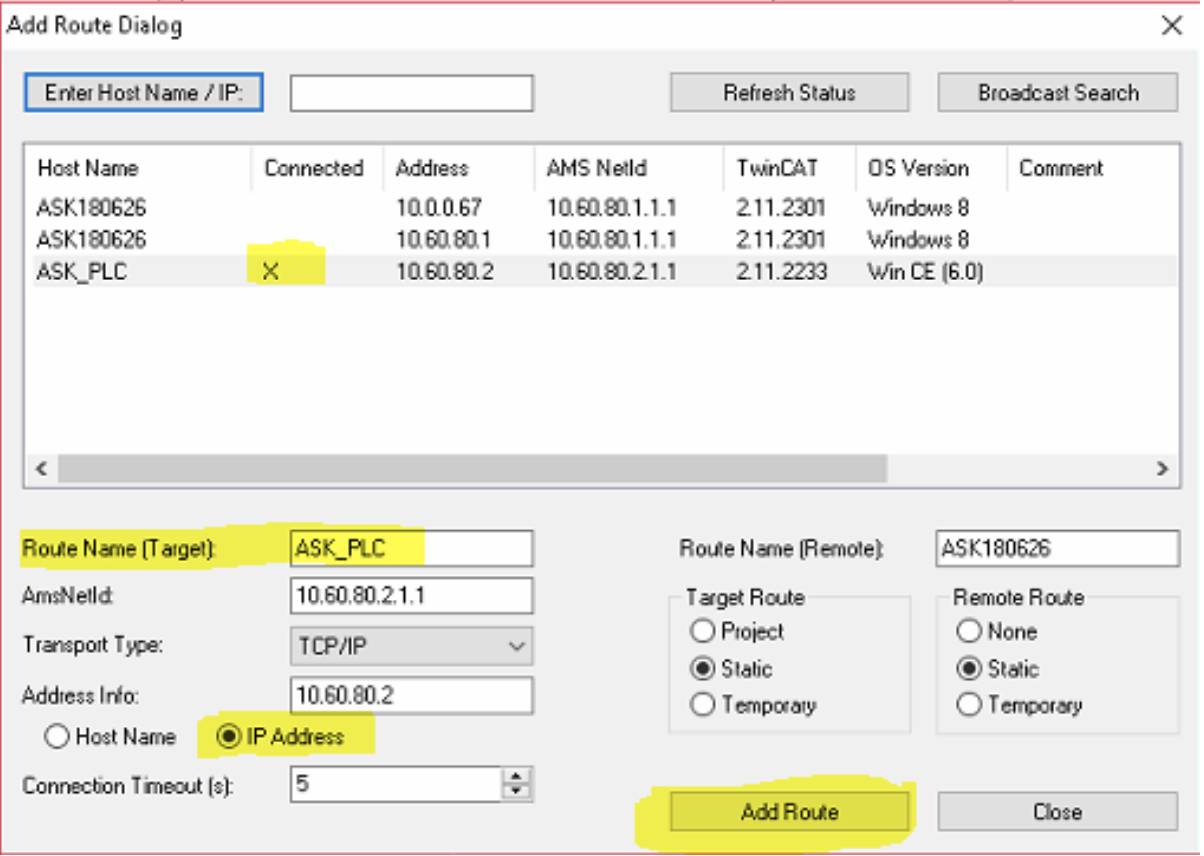
5. Now you can close the Add Route Dialog and the Choose Target System, there should be new route available named for example ASK_PLC_22 which you can select and press OK which will close the window
6. Now you should be able to see successful connection to the PLC in the main window status bar similar to following: ![]() 7. You can close the TwinCAT System Manager
7. You can close the TwinCAT System Manager
Configuration of the IP cameras
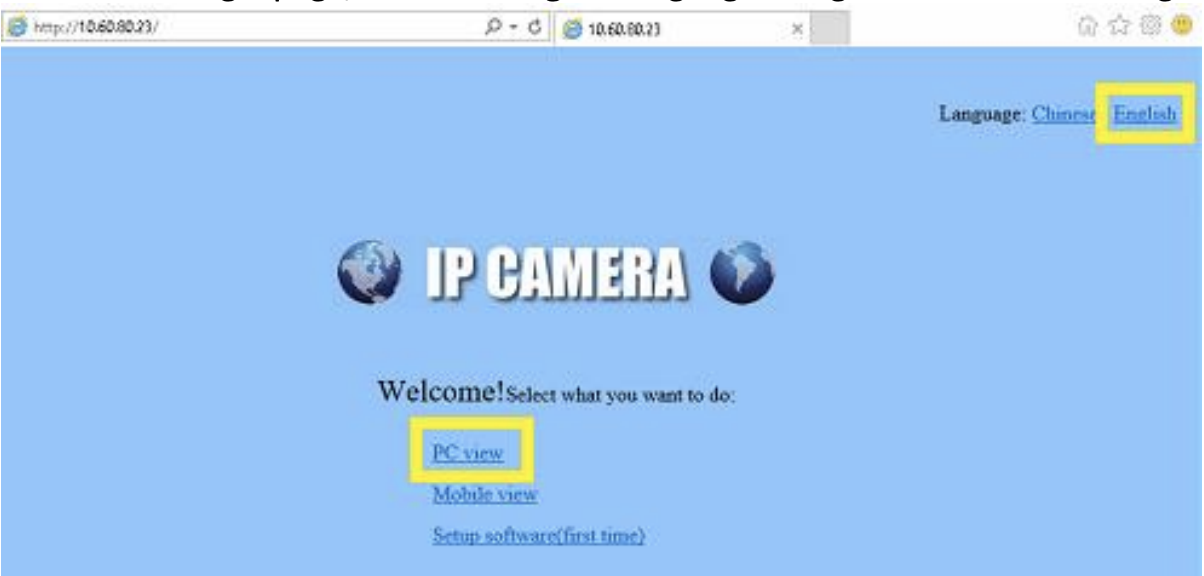
1. Open Internet explorer (iexplorer.exe) and navigate to 10.60.80.13 to access the IP camera configuration page 2. Enter credentials to login (name: admin, password: admin). Beware that sometimes the login window remains hidden bellow the browser, so check with the ALT+TAB.

3. Once on the login page, switch to English language and go to PC view to configure the camera
4. On the main view navigate to the Settings in the left pane, select Network from the menu and then Network again from the submenu. In the page that appears on the right side change the IP address of the camera to new IP address (for example 10.60.80.23) and press Apply button to save the changes.
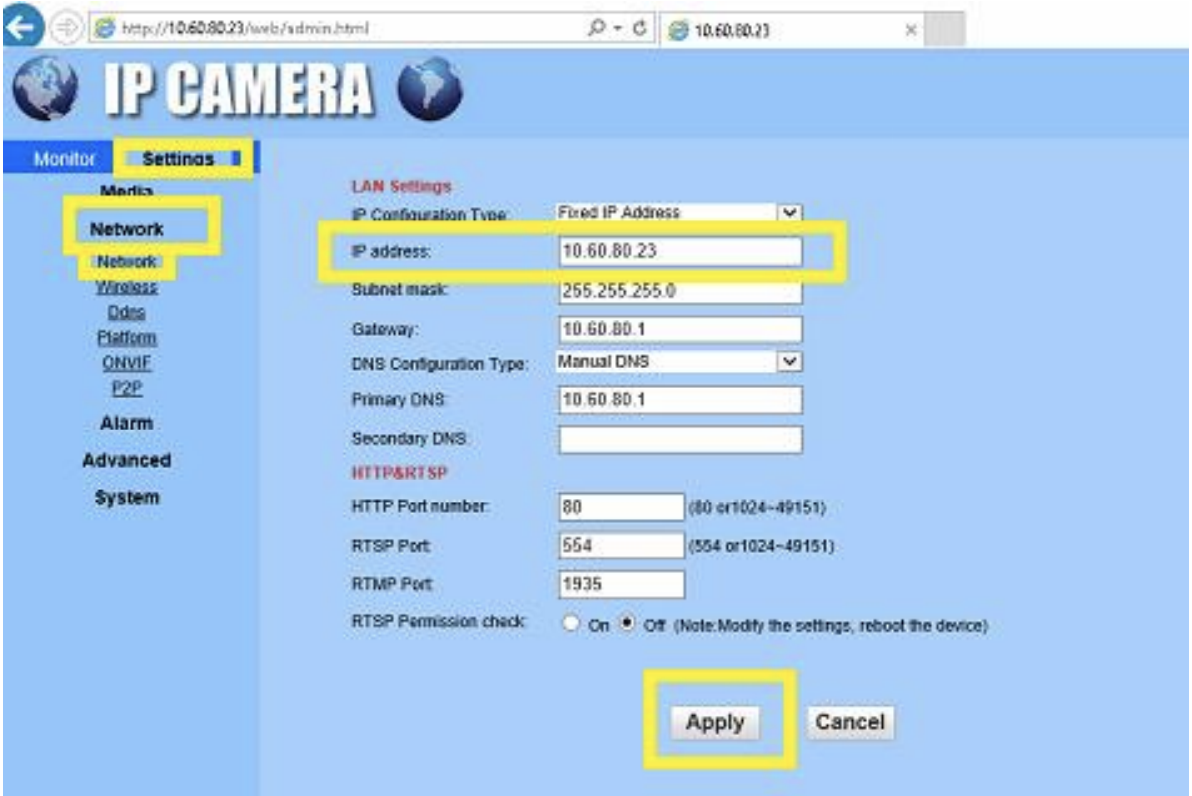
5. This will disconnects you from the camera (because of change of the IP address). To verify if everything is setup correctly just navigate to the new IP address in the browser (for example 10.60.80.23). To login popup should appear again (do not forget to ALT+TAB) and after login the camera should be available on the new IP address.
Installation of the filters for IP cameras (if missing)
1. Download RTSP/RTMP/HTTP/ONVIF DirectShow Source Filter from https://www.dropbox.com/s/lfq4v0pm4712vqw/rtsp_filter.zip
2. Extract to any folder on the file system. 3. Run the installer DatasteadRTSPFilterInstaller.exe and follow the instructions or register the filters manually (description can be found in within the zip file Install_Readme.txt)
ASK Control configuration
1. Go to the folder C:\ASK\INIs and open file ASK_askcontrol.ini
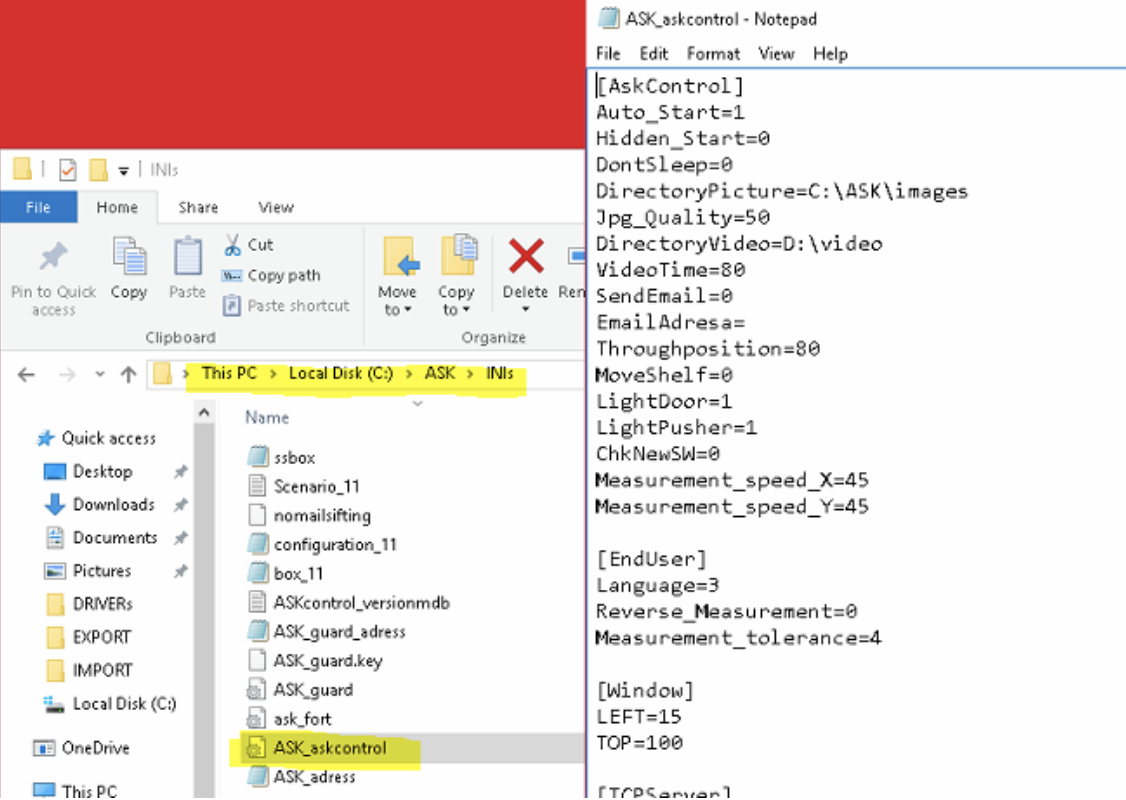
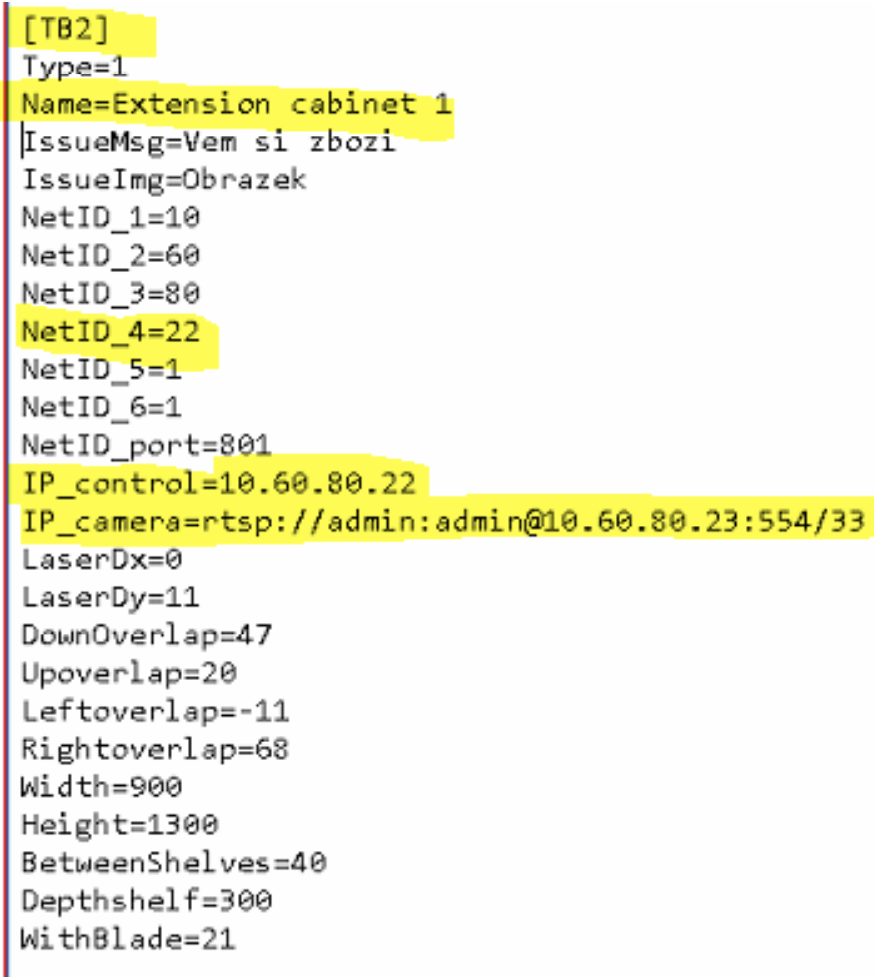
2. Locate section marked with [TB1] and copy all the configuration fields to the newly created section named [TBx] (replace x with next number in the sequence, for example 2). The number after TB here is the ID of the extension cabinet which should be then put to the Smart Supply slave cabinet configuration. Change the value of IP_control field to the new IP address of the extension cabinet (for example 10.60.80.22) and change value of the NetID_4 field to last number from the IP address (for example 22). Change values of the Name filed to something meaningful (like Extension cabinet 1) – this name is then shown in the ASK Control when doing configuration.
3. For access to the IP camera configured in the previous section, change value of the IP_camera field to rtsp://admin:admin@10.60.80.23:554/33>buffer=0>lowdelay=1>vidsync=0 where the IP address is IP address of the camera configured in the previous step.
4. You should end up with new entry in the configuration file similar to following:
5. Save and close the ASK_askcontrol.ini file
6. Exit the ASK Control application and start it again from the C:\ASK\ASK_askcontrol.exe
7. Extension cabinet should be now visible in the ASK Control application (for example in the bottom bar) ![]() 8. By clicking on the extension cabinet that cabinet become active and can be configured. Shelves rescanned, codes assigned to the shelves etc.
8. By clicking on the extension cabinet that cabinet become active and can be configured. Shelves rescanned, codes assigned to the shelves etc.